Ceramic pots have long been cherished for their beauty and functionality, but did you know that hand-painting your own is a rewarding and therapeutic activity? With some creativity and a few basic supplies, you can transform ordinary pots into personalized pieces of art that you’ll be proud to display or give as gifts. This article will guide you through the process of hand-painting ceramic pots, from selecting the right materials to sealing your masterpiece for long-lasting enjoyment.
- Choosing Your Ceramic Pot
The first step is selecting the ceramic pot you’d like to paint. There is a wide variety of shapes, sizes, and materials to choose from. When making your selection, consider the purpose of your pot and the environment in which it will be used. For outdoor use, choose a pot made from a durable material like terracotta or stoneware. For indoor use, you may want to choose a pot made from porcelain or earthenware, which are more delicate and better suited for decorative purposes.
- Gathering Your Painting Supplies
Once you have your pot, you’ll need the following supplies to get started:
- Ceramic paint or acrylic paint
- Paintbrushes in various sizes
- A pencil for sketching your design
- A palette for mixing paint colors
- A clean cloth for wiping brushes
- A cup of water for rinsing brushes
- Newspaper or a drop cloth to protect your work surface
- Preparing Your Workspace
Designate a well-lit, comfortable area where you can work on your project. Lay down newspaper or a drop cloth to protect your surface from paint spills. Make sure you have enough space to comfortably move your arms and have easy access to your supplies. Good lighting is essential for accurate color mixing and detailed work, so ensure that your workspace is well illuminated.
- Sketching Your Design
Before you start painting, it’s a good idea to sketch your design onto the pot using a pencil. This will give you a visual guide to follow as you apply your paint. Feel free to get creative with your design, incorporating shapes, patterns, or even text. If you’re unsure of what to paint, consider the pot’s intended use, the surrounding environment, or the preferences of the person you’re giving the pot to as a gift.
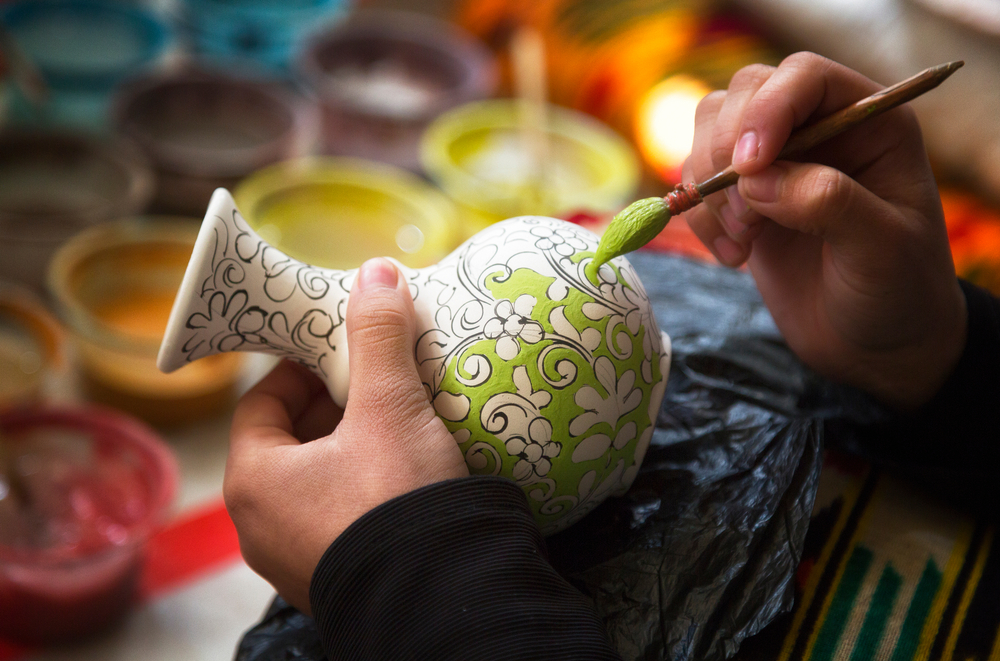
- Painting Your Ceramic Pot
Now comes the fun part—painting! Make sure your pot is clean and dry before you begin. If you’re using ceramic paint, follow the manufacturer’s instructions for application. If you’re using acrylic paint, you may need to apply a layer of primer first to ensure proper adhesion.
Start with the largest areas of color in your design, working from the background to the foreground. Use a larger brush for broad strokes and switch to a smaller brush for finer details. Take your time, and don’t worry if you make a mistake—simply use a damp cloth to wipe away the paint before it dries.
- Mixing and Layering Colors
One of the joys of hand-painting ceramic pots is the ability to mix and layer colors to create unique shades and textures. To mix colors, simply add small amounts of paint to your palette and blend them together with a brush or palette knife. Experiment with different ratios to achieve the desired color. Layering can be done by applying multiple coats of paint or by painting wet-on-wet, allowing colors to blend directly on the pot. Remember that lighter colors should be applied first, followed by darker ones.
- Allowing Your Pot to Dry
Once you’ve finished painting, allow your pot to dry completely. This may take several hours to a full day, depending on the type of paint and the thickness of your application. Resist the temptation to touch or move your pot during this time, as doing so can smudge the paint or damage the design.
- Sealing Your Hand-Painted Ceramic Pot
To protect your hand-painted ceramic pot and ensure its longevity, it’s essential to seal it with a clear, protective finish. There are several options available, including spray sealants, brush-on sealants, and even food-safe sealants if you plan to use your pot for serving or storing food.
Before sealing your pot, ensure that it’s completely dry and free of dust or debris. Follow the manufacturer’s instructions for the sealant you’ve chosen, applying it in a thin, even layer. You may need to apply multiple coats, allowing each one to dry before applying the next. Be sure to cover every painted surface, including any small details or crevices.
- Caring for Your Hand-Painted Ceramic Pot
To keep your hand-painted ceramic pot looking its best, handle it with care and clean it gently. Avoid exposing your pot to extreme temperature changes, which can cause the ceramic to crack or the paint to peel. When cleaning, use a soft cloth or sponge and mild soap, avoiding abrasive cleaners or scrubbers that could damage the paint. If your pot is sealed with a food-safe finish, it may be dishwasher safe, but hand-washing is always the safest option to preserve your artwork.
- Enjoying Your Hand-Painted Masterpiece
Now that your hand-painted ceramic pot is complete, it’s time to enjoy it! Display it proudly in your home, use it to hold a beautiful plant, or give it as a one-of-a-kind gift to a friend or family member. Hand-painting ceramic pots is a rewarding and enjoyable way to express your creativity and create something truly unique. So go ahead, unleash your inner artist, and start your next hand-painted ceramic pot project today!